Spring Home Maintenance Checklist: Roof repair and replacement
The roof of the house probably undergoes the most stress from seasonal changes in Canada, as it has to face the beating sun in the summers as well as the ice and snow in the winters, while also maintaining the flexibility to allow for expansion and contraction through the seasons. Over time these stresses cause damage to the shingles so you’ll find that they don’t last as long as their description suggests–though they are marketed as 20- to 50-year shingles, you usually have to replace them in half that time. Following our recent article on the Spring Maintenance Checklist, today we will focus on the roof.
Water in the attic
As mentioned in our last article on foundation cracks, small water leaks may not be apparent right away, but given enough time it can cause a lot of damage. If you see a wet patch on the ceiling or worse yet–water is dripping from the ceiling–you know you’ve got a problem that needs immediate attention. When the roof leaks it can damage all kinds of things in your attic such as insulation, wood, drywall, and can cause rusting of any exposed metal. If water sits there for a while there are long term risks such as mold or bacterial growth. If it goes beyond the attic it can damage the rest of your house and your belongings, and that’s why it’s a good idea to inspect your attic from time to time. It’s best to do this during the daytime to also inspect for light leaks. You will need:
- Ladder to climb up to the attic door.
- Long-sleeve shirt and work gloves to protect yourself from touching the fiberglass insulation directly.
- Flashlight or headlamp to see around.
- Board(s) to stand on for stability, as most people only have exposed framing with no flooring in the attic.
- DO NOT stand on the drywall that the insulation sits on, as it can’t handle your weight and you’ll end up falling into your bedroom.
Check for any wet areas or stains that may indicate water leakage. You can also turn off your flashlight and see if any light is leaking in from outside. If so, you know water might be getting in from that gap. While you’re there you can also check for any large gaps in the soffits (venting around the bottom edge of the roof) which may be caused by animals making their way into the attic to keep warm during the winter.
Parts of a roof
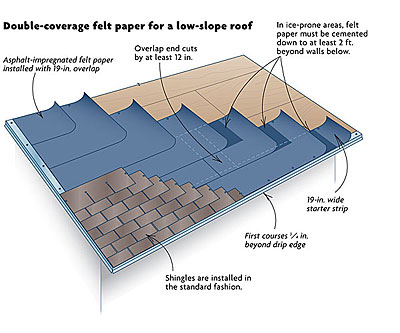
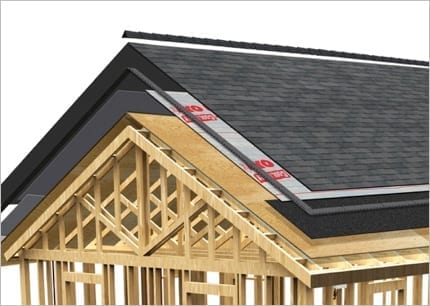
Once you know there is a leak you have to identify which part of the roof seal has failed. From the attic you would have seen that there is wood framing that provides the structure and shape of the attic. The next layer is a wooden deck (the large flat boards) that provides the solid wood surface to attach the roof. Builders will then add a sheet of felt or synthetic sheathing “paper” that acts as a water barrier that also allows the roof to breath. Then they add the asphalt shingles on top of that, which takes most of beating from the weather. Some people use other materials such as metal or clay instead of asphalt, but the most common material is asphalt shingle.
Inspecting the roof
The next part involves getting a view of the shingles, so you will need a long ladder. You don’t need to climb on the roof at this point, but will need to be able to see the condition clearly to make an informed decision on what needs to be done next. Alternatively if your ladder is not tall enough, you could try putting your smartphone on a selfie stick to reach up to record some videos of the roof. Or, you could stand further down the street from your house (or ask a neighbour if you can look from their window) to get a better perspective and use binoculars to get a closer look. You are looking for things such as:
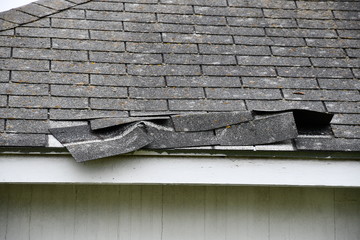
- Blistered, curled, broken or split shingles.
- Loose or missing shingles, exposed sheathing paper.
- Loose or exposed nails, or nails that popped out or are rusty.
- Shingles are overlapped so that the nails are not directly exposed to water, so if you see any rust stains you know a nail is getting wet when it rains.
- Damaged or rusted flashing.
- Flashing is a type of galvanized metal to direct water away from two surfaces that meet at an angle, such as where a chimney meets the roof.
- Cracked or missing caulk on any flashing.
- A sagging roof may indicate parts of the wooden deck has gotten wet and needs to be replaced as well.
- Algae or moss on roof indicates water is pooling in an area so the roof may not be properly draining.
In some cases homeowners may have decided to have roofers install new shingles on top of old shingles to save on the cost of removing the old ones, however that causes future problems because the old shingles will continue to curl and warp so the new shingles will be pulled away from the roof and won’t provide a proper barrier. If you’ve got two layers of shingles and have a water leak, it may be time to consider having it all removed and replaced with new shingles.
When in doubt, call the professionals
Once you have identified what needs to be repaired, you have to decide if you are going to do it yourself or hire a professional. While the average handyman can feel relatively safe doing minor repairs inside the house, any repairs involving ladders can be dangerous, especially if you’re climbing up to another floor to do any work. It’s imperative to have the proper safety measures in place, through proper procedures and also the proper safety gear such as a harness to keep you anchored. If you’re not comfortable doing any repair don’t do it! Safety should be your number 1 priority. In some cases you may feel comfortable replacing one or two shingles that you can reach comfortably and safely. When doing so keep in mind that roofing nails need to be hidden from rain, and that the shingles are overlapped so that there are no gaps where the nails should be hidden. If a shingle needs to be replaced check the sheathing under it, and if sheathing needs to be replaced you should check the wooden deck under it. You will see the pattern of how the existing shingles and sheathing are overlapped so that water is directed away: you always put the edge facing down so water runs away from the edge.


